

Table of Contents
So, you’ve heard about WhatsApp Cloud API and are wondering if it is the real deal for scaling my business communications? Short answer: absolutely yes. Whether you’re a solo developer, a startup founder, or a marketing director at a mid-sized company, WhatsApp Cloud API is quickly becoming the most powerful and accessible messaging tool available today. And the best part? Getting started doesn’t require deep pockets or a team of enterprise engineers.
In this comprehensive guide, we’re going to walk you through everything you need to know — from what WhatsApp Cloud API actually is, to how to set it up step-by-step, to understanding pricing, webhooks, error codes, and even how to send your very first message. Think of this guide as your GPS; it’ll tell you exactly where to go and what to do next. Let’s dive in.
What Is WhatsApp Cloud API?
Before we jump into the how, let’s talk about the what. WhatsApp Cloud API lets you send and receive messages using a cloud-hosted version of the WhatsApp Business Platform. The Cloud API, hosted by Meta, allows you to implement WhatsApp Business APIs without the cost of hosting your own servers and also allows you to more easily scale your business messaging.
Think of it like renting a high-speed sports car instead of building one from scratch. You get all the power without the overhead. When Meta launched the WhatsApp Business API, there were certain drawbacks to it. One of the biggest ones was the requirement to use a Business Service Provider (BSP) to obtain the API. On top of that, the application process took a long time, and few businesses could afford the outrageous fees that BSPs were charging. So, to make its API more accessible, Meta introduced the WhatsApp Cloud API, which replaces the BSP servers with cloud servers owned by Meta.
That shift was a game-changer. Suddenly, businesses of all sizes could tap into the world’s most popular messaging platform without jumping through hoops.
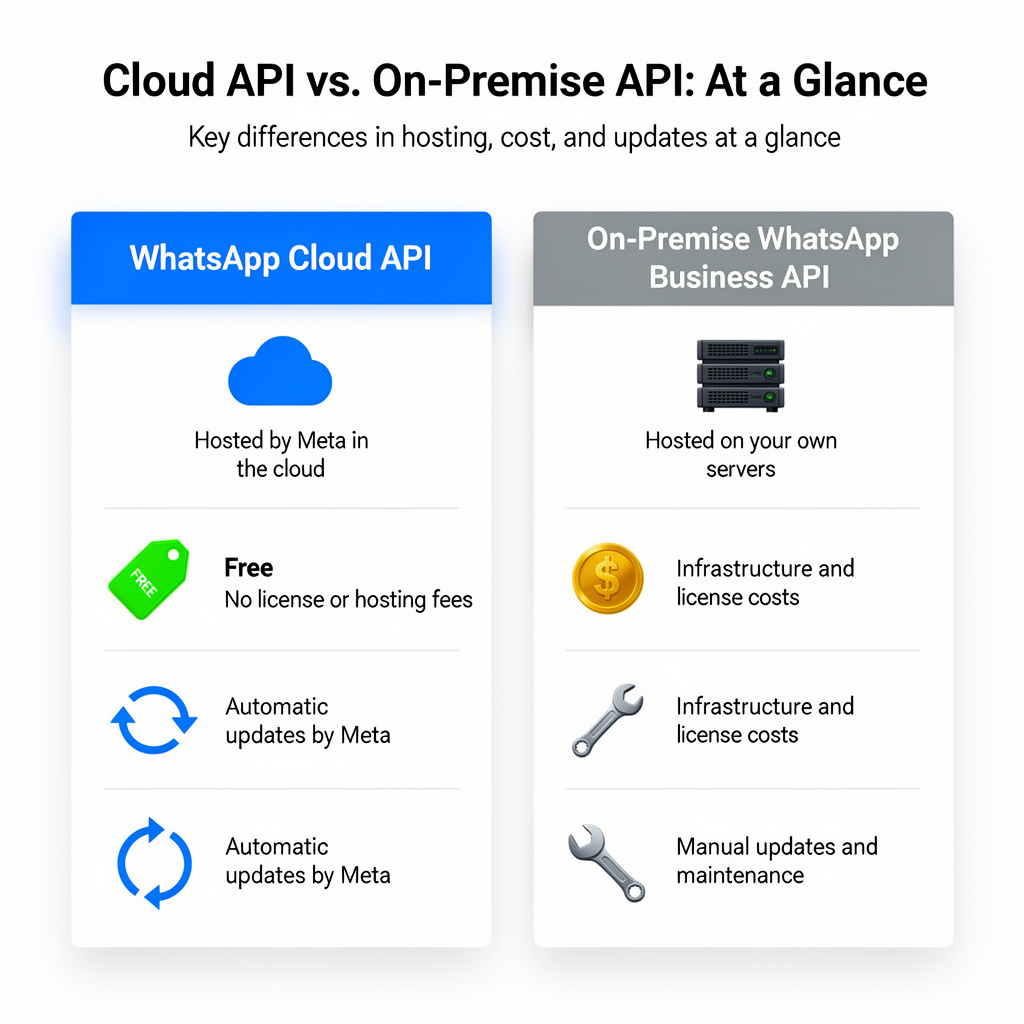
How Is WhatsApp Cloud API Different from WhatsApp Business API?
This is one of the most common questions people ask and it’s a fair one! The confusion is understandable because both are part of the WhatsApp Business Platform. But there are some very meaningful differences between them. Cloud API is hosted by Meta, making it faster and cheaper. Business API is hosted by third-party BSPs, giving you more control over your own infrastructure.
Cloud API vs. On-Premise API: Key Differences at a Glance
| Feature | WhatsApp Cloud API | WhatsApp Business API (On-Premise) |
|---|---|---|
| Hosting | Meta’s servers | Your own / BSP servers |
| Setup complexity | Low | High |
| Cost | Free API access | BSP setup & maintenance fees |
| Updates | Automatic | Manual |
| Scalability | Auto-scaling | Requires manual scaling |
| Security patches | Automatic | Manual |
Since the WhatsApp Cloud API is hosted by Meta, your business theoretically gains faster and more secure access to the platform — even at the backend level. Security updates for the WhatsApp API can be implemented more quickly. API upgrades will also be rolled out faster.
In simple terms, the Cloud API is like using Gmail, while the on-premise API is like running your own mail server at home. One is infinitely easier to maintain.
Why WhatsApp Cloud API Is the Future of Business Messaging
This isn’t just marketing speak. The fact is that from 2026 onwards, WhatsApp will prioritize and support only the WhatsApp Cloud API. Unlike the WhatsApp Business API, the servers will be hosted directly by Meta rather than by WhatsApp Business API partners. The WhatsApp Cloud API is certainly becoming the new forward-looking standard for companies that don’t want to give up WhatsApp for customer communication. According to official statements, service for the WhatsApp API (on-premise) will end in October 2025 no more updates, no support.
If you’re still clinging to the old WhatsApp Business API, this is your wake-up call.
Top Benefits of Using WhatsApp Cloud API
Let’s break down the major perks:
- Zero hosting costs: Cloud API removes the hassle of self-hosting. You don’t need to manage your own server, secure uptime, or maintain manual updates. Everything runs on Meta’s infrastructure, which means faster setup and fewer technical issues.
- Free API access: The setup fees for the WhatsApp Cloud API are completely free. As a result, companies of all sizes can now use the WhatsApp Business API to start sending WhatsApp blasts without having to pay anything upfront.
- High throughput: You can send and receive up to 80 messages per second to a variety of client numbers using the Cloud API service. If scaling is a concern, WhatsApp Cloud API automatically scales to handle your workload and refreshes its security automatically as well.
- Immediate access to new features: Starting in 2025, Meta will fully focus on the cloud version, which is also offered free of charge. Additionally, the servers are hosted by Meta, and your team will benefit from faster updates and new features.
Who Should Use WhatsApp Cloud API?
Not sure if this is for you? Here are some common use cases:
- E-commerce stores that want to send order confirmations and shipping updates, banks and fintechs needing OTPs and fraud alerts, businesses running automated customer support with chatbots, and developers looking to build apps using the WhatsApp API.
- The WhatsApp API is no longer limited to big enterprises — with the WhatsApp Cloud API free setup, even startups and developers can integrate it within minutes.
How to Get WhatsApp Cloud API Access
If you want to use the WhatsApp Cloud API, the setup process is done through Meta for Developers. You’ll need a Meta developer account, a business app, the WhatsApp product enabled inside the app, a temporary access token for testing, and a verified phone number to start sending test messages. Meta’s official “Get Started” flow also includes sending your first template message and configuring webhooks for receiving delivery, read, and inbound message events.
Requirements Before You Start
Before setting up WhatsApp Cloud API access, make sure you have:
- A Facebook account or a managed Meta account
- A Meta developer account
- Access to Meta for Developers
- A Meta Business Portfolio / Business Manager (recommended for production use)
- A phone number for testing or production onboarding
- A public webhook callback URL if you want to receive incoming events
Meta allows you to begin testing with a developer app and a temporary token, but production use usually requires a more complete business setup and long-term token strategy.
1) Register as a Meta Developer
To use WhatsApp Cloud API, you must first be registered as a Meta developer.
Go to the Meta for Developers portal and sign in with your Facebook account. If your account is not yet registered as a developer, Meta will prompt you to complete developer registration. This part is free and only takes a few minutes.
Important fact check:
Your draft included a developer registration URL with /async/registration/, which is not ideal to show in content. For SEO and trust, it’s better to refer users to the main Meta for Developers portal instead of a raw internal-style path. Meta’s official WhatsApp Cloud API onboarding starts from the developer documentation and app dashboard flow.
2) Create a Meta App for WhatsApp Cloud API
Once your developer account is ready, create a new app inside Meta for Developers.
Inside the dashboard, click Create App and choose the app type that supports business messaging. In most onboarding flows, Meta’s official documentation describes this as creating a new Meta developer app and then setting it up with WhatsApp.
Your original version said to always choose “Business” as the app type. That is commonly used in many guides, but Meta’s current documentation emphasizes the Get Started flow inside the developer app dashboard rather than over-focusing on one exact UI label, since Meta sometimes changes dashboard labels and onboarding screens. So for accuracy and future-proofing, it’s better to say:
- Create a Meta developer app
- Follow the WhatsApp setup flow in the app dashboard
- Associate it with your Business Portfolio / Business Manager if prompted
This keeps the guide accurate even if Meta slightly changes the UI.
3) Add the WhatsApp Product to the App
After the app is created, enable WhatsApp as a product inside the app dashboard.
If Meta shows a product setup screen immediately after app creation, choose WhatsApp and click Set Up. If not, open your app later from My Apps, then add the WhatsApp product from the product list.
Once enabled, Meta will open the WhatsApp > API Setup / Getting Started section. This is the main control panel where you can:
- Access your temporary token
- See your test business phone number
- View your Phone Number ID
- View your WhatsApp Business Account ID (WABA ID)
- Send your first template message
- Start webhook configuration
This is the correct central area for initial Cloud API onboarding.
4) Use the Temporary Access Token for Initial Testing
Meta provides a temporary user access token in the WhatsApp > API Setup / Getting Started panel for testing.
This token is used to authenticate API requests while you’re still in the initial setup phase.
Important fact check:
“click the blue Generate access token button”
That wording may be outdated or UI-specific. Meta’s official docs currently explain that when you open the WhatsApp > API Setup panel, the dashboard provides a temporary user access token, and Meta notes that this panel generates a new user token when accessed. So instead of saying there is always a “blue button,” the more accurate wording is:
- Open App Dashboard > WhatsApp > API Setup
- Copy the temporary access token shown in the panel
Meta also recommends moving to a system user token or business token strategy for long-term production use because temporary tokens expire and are not suitable for permanent deployments.
5) Use the Test Phone Number and Send Your First Message
When you enable WhatsApp Cloud API in a new app, Meta usually gives you a test business phone number in the Getting Started / API Setup panel.
From there, you can send a template message to a recipient number that you add to the allowed test list.
What actually happens in testing:
- Meta provides a test sender number
- You add a recipient number in the allowed list
- The recipient number must be verified
- After verification, you can send a test template message from the dashboard or API
Important fact check:
Your draft mixed together “Add and Verify Your Phone Number” in a way that sounded like the sender’s number is being verified in this step. In the test environment, what you’re usually verifying is the recipient number that will receive test messages from the Meta-provided test number. Meta allows only a limited number of test recipients during the initial setup phase.
So the cleaner and more accurate version is:
- Use the Meta-provided test WhatsApp business number
- Add a recipient phone number to the allowed list
- Verify that recipient number through WhatsApp
- Send a test template message
6) Note the IDs You’ll Need for API Calls
Inside the API Setup panel, save these details because you’ll need them for integration:
- Temporary Access Token (for testing only)
- Phone Number ID
- WhatsApp Business Account ID (WABA ID)
- Business Account / App details as needed later
These values are required when sending messages through the Messages API, authenticating requests, and managing business assets. Meta’s Message API requires a valid bearer token and the correct phone number ID.
7) Configure a Webhook to Receive WhatsApp Events
If you want to receive inbound messages and delivery-related updates, you must configure a webhook.
Webhooks allow your application to receive real-time notifications for events such as:
- Incoming customer messages
- Message sent status
- Message delivered status
- Message read status
- Account-related updates
To do this, add a public callback URL and verify token in the webhook configuration area, then subscribe your app to the required WhatsApp webhook fields.
Meta’s official Get Started flow specifically includes setting up the test webhook app as part of the onboarding path.
Best practice:
For blog readers, mention that webhook setup is optional for sending outbound test messages, but required for receiving inbound events and delivery/read callbacks.
That makes the guide more accurate and less confusing.
8) Move From Testing to Production Access
Testing with the temporary token and the Meta-provided test number is only the beginning.
For real production usage, you’ll typically need to:
- Add your own business phone number
- Complete business verification if required
- Use a permanent token strategy (usually a system user token or Embedded Signup flow)
- Register or onboard your business number properly
- Configure templates and message permissions for production sending
Meta’s documentation and blog both make it clear that temporary user tokens are for testing, while long-term production access requires a more stable authentication setup.
How to Send Your First Message Using WhatsApp Cloud API
Now comes the fun part — actually sending a message! Think of this as launching your first rocket. It might seem complex, but once you do it once, you’ll wonder why you were ever worried. In Quickstart, click on the “Start using the API” button and follow the first 2 steps to send the hello_world template message to a phone number of your choosing. Make sure to retain both your test phone number ID and WhatsApp Business Account ID for later use. When you use these test assets, you don’t pay to send messages as you work to develop your app. Once you are ready to start sending messages to your customers, you can add a real business phone number in the API Setup panel and create a real WABA (WhatsApp Business Account).
Sending Template Messages
Template messages are pre-approved message formats that you can use to initiate conversations outside of the 24-hour customer service window. 1The basic setup covers sending your first message, and you’ll also learn how to generate secure access tokens and send both template and non-template messages.
To send a message via the API, you’ll make an HTTP POST request to:
texthttps://graph.facebook.com/v17.0/{phone-number-id}/messages
With a JSON body like this:
JSON{
  "messaging_product": "whatsapp",
  "to": "RECIPIENT_PHONE_NUMBER",
  "type": "template",
  "template": {
    "name": "hello_world",
    "language": { "code": "en_US" }
  }
}
Simple, right? Just swap in your phone number ID and the recipient number, and you’re off to the races.
Using Postman Collection for WhatsApp Cloud API
If you’re not a fan of writing raw code, Postman is your best friend. Meta provides a Postman collection that pre-loads all the necessary API endpoints, headers, and example request bodies. Here’s how to use it:
- Download the WhatsApp Cloud API Postman collection from Meta’s developer docs.
- Import it into Postman.
- Set your environment variables:
access_token,phone_number_id, andwhatsapp_business_account_id. - Hit any endpoint and see the results instantly.
It’s the perfect sandbox for testing before you integrate into a live application.
WhatsApp Cloud API Webhook: Everything You Need to Know
Webhooks are the nervous system of your WhatsApp Cloud API integration. They allow Meta to push real-time events to your server — like when a message is delivered, read, or when a customer replies. In WhatsApp, webhooks can notify you of many events in your app, like message delivery and read notifications, and even account changes.
Here’s what you can listen to with webhooks:
- Message received — when a customer sends you a message
- Message delivered — confirmation that the message hit the recipient’s device
- Message read — when the recipient opens and reads the message
- Status changes — updates to your phone number or account
To configure your webhook:
- Go to your App Dashboard.
- Navigate to WhatsApp > Configuration.
- Add your Callback URL (your server endpoint).
- Add a Verify Token (a custom string you define for security).
- Select the webhook fields you want to subscribe to.
Make sure your webhook endpoint responds with a 200 OK status and echoes back the hub.challenge parameter during the verification step — this is how Meta confirms your endpoint is live.
How to Get a Permanent Access Token in WhatsApp Cloud API
One of the trickiest parts of the WhatsApp Cloud API setup is handling access tokens. The default user access token expires after a short time — which is great for testing but terrible for production.
Here’s how to get a permanent (non-expiring) System User Access Token:
- Go to Meta Business Suite → Settings → Users → System Users.
- Click Add and create a new System User (give it Admin access).
- Click Generate New Token.
- Select your App and choose the required permissions:
whatsapp_business_messagingandwhatsapp_business_management. - Set the token expiry to Never.
- Copy and store this token securely — treat it like a password.
In the left-hand menu of the App Dashboard, navigate to WhatsApp > API Setup and click the blue “Generate access token” button. Complete the flow to generate a user access token. Normally, you will be using a system token or business token, but for these steps, a user token is sufficient.
For production environments, always use a System User Token — it won’t expire and won’t be tied to any individual’s personal Facebook account.
WhatsApp Cloud API Pricing
Okay, let’s talk money — because this is where a lot of people get confused. Here’s the bottom line: 6Cloud API is free, but messaging is charged per conversation. Rates vary by country and template type.
New Per-Message Pricing vs. Old Conversation-Based Pricing
This is big news for 2025. Effective July 1, 2025, WhatsApp is making its biggest pricing overhaul yet. No more conversation-based pricing! Every message will now be metered, measured, and billed. Starting July 1, 2025, WhatsApp is switching from Conversation-Based Pricing (CBP) to Per-Message Pricing (PMP), a move designed to simplify billing and align with industry standards. Businesses will now be charged based on the number of messages sent, rather than per conversation session. This change aims to be more cost-effective for businesses with varying messaging volumes. Different types of messages (e.g., marketing, authentication, service, utility) will have distinct pricing, so businesses can optimize their costs based on the messaging strategies they employ.
Here’s a quick summary of the message categories and how they’re charged:
| Message Type | Description | Charged? |
|---|---|---|
| Marketing | Promotional campaigns, product updates | Yes — per message |
| Utility | Transactional updates, order confirmations | Yes (free within service window) |
| Authentication | OTPs, login codes | Yes — per message |
| Service | Customer-initiated replies | Free within 24-hr window |
Meta charges per-message fees for outbound messages that vary by message type and country. For example, marketing messages sent to India are priced at $0.0107, while those sent to Germany cost $0.1365 — making Germany nearly 13 times more expensive.
Free Messaging Windows You Should Know About
Here’s how to save money smartly: When a customer messages you first, this opens a 24-hour customer service window to reply freely without paying for every message — as long as you’re using free-form text or utility message templates. Utility templates sent within an open 24-hour customer service window are completely free. Conversations are also free when customers initiate them via click-to-WhatsApp ads or Facebook Page call-to-action buttons. Additionally, the 24-hour customer service window will be extended to 72 hours when customers message you through these free entry points.
Smart tip: Design your messaging flows to keep customers within these free windows as much as possible — it can dramatically reduce your monthly bill.
Upload Media Using WhatsApp Cloud API
Sending images, PDFs, videos, and audio files is a powerful feature of the WhatsApp Cloud API. Here’s how to upload media:
Step 1: Make a POST request to upload your media file:
textPOST https://graph.facebook.com/v17.0/{phone-number-id}/media
Step 2: Include the file in the request body as multipart/form-data, along with:
messaging_product:"whatsapp"type: e.g.,"image/jpeg"file: your actual media file
Step 3: You’ll receive a media_id in response. Use this ID in your message request:
JSON{
  "messaging_product": "whatsapp",
  "to": "RECIPIENT_NUMBER",
  "type": "image",
  "image": {
    "id": "MEDIA_ID"
  }
}
Supported media types include:
- Images: JPEG, PNG (max 5MB)
- Documents: PDF, DOC, XLSX (max 100MB)
- Audio: MP3, OGG, AMR (max 16MB)
- Video: MP4, 3GPP (max 16MB)
- Stickers: WEBP (max 500KB)
Pro tip: Media files are stored on Meta’s servers and expire after 30 days, so download and archive anything important.
Common WhatsApp Cloud API Error Codes and How to Fix Them
Errors are inevitable. But knowing what they mean turns a frustrating roadblock into a quick speed bump. Here are the most common ones:
| Error Code | Meaning | Fix |
|---|---|---|
| 100 | Invalid parameter | Check your JSON body for typos |
| 130429 | Rate limit hit | Slow down your message volume |
| 131030 | Recipient not on WhatsApp | Verify the recipient’s number |
| 131047 | Re-engagement message error | Ensure you’re within the 24-hr window |
| 131051 | Unsupported message type | Check the media type you’re sending |
| 135000 | Generic user error | Review full error message details |
Always check the error.message and error.error_data.details fields in the API response body — Meta usually provides a human-readable explanation right there.
“This Number Is Unregistered” – WhatsApp Cloud API Error Fix
This is one of the most Googled errors related to WhatsApp Cloud API, and it’s actually fairly simple to fix.
Why it happens: The phone number you’re trying to use is either:
- Already registered for a personal WhatsApp account
- Already registered for a WhatsApp Business App
- Not properly verified during setup
How to fix it:
- Delete the existing WhatsApp account linked to that number (backup your data first!)
- Use a completely fresh number not associated with any WhatsApp account
- Make sure you completed the OTP verification step during API setup
- If the number was previously used with an on-premise API, deregister it through the old system first before re-registering it with the Cloud API
WhatsApp Cloud API vs WhatsApp Business API: Which One Is Right for You?
This is the million-dollar question. Let’s settle it once and for all.5 Previously, companies could only use a BSP that provided on-premise API to get the WhatsApp API service. With the launch of WhatsApp Cloud API, companies can get WhatsApp API from a BSP that provides WhatsApp Cloud API or build their own business messaging tools with in-house developer resources.
Choose WhatsApp Cloud API if you:
- Want a free, fast setup without server management
- Are you a startup, SMB, or solo developer
- Want automatic updates and scalability
- Don’t have the resources to manage on-premise infrastructure
Consider WhatsApp Business API (On-Premise) if you:
- Need full data sovereignty and control
- Operate in regions with strict data residency laws
- Have large in-house DevOps teams
But here’s the reality check: By the end of 2025 at the latest, the WhatsApp Business API will no longer receive official support or updates. So even if you prefer on-premise for now, the migration to Cloud API isn’t optional — it’s inevitable.2 The WhatsApp Cloud API offers a potentially more stable and secure alternative to the WhatsApp Business API. Starting in 2025, Meta will fully focus on the cloud version, which is also offered free of charge.
The verdict? Unless you have a very specific, compliance-driven reason to stick with on-premise, the WhatsApp Cloud API is the clear winner for 2025 and beyond.
Conclusion
If you’ve made it this far, congratulations — you’re now equipped with everything you need to set up, use, and optimize WhatsApp Cloud API for your business. From creating your Meta developer account to sending media-rich messages, configuring webhooks, avoiding common errors, and understanding the new per-message pricing model — this guide has covered it all.
The bottom line is simple: WhatsApp Cloud API is no longer a “nice to have.” It’s the future-proof foundation of business communication. The WhatsApp Cloud API is certainly becoming the new forward-looking standard for companies that don’t want to give up WhatsApp for customer communication. Whether you’re automating customer support, sending transactional alerts, or running personalized marketing campaigns, this API gives you the power to do it all — at scale, for free to set up, and with Meta’s rock-solid infrastructure behind you.
So what are you waiting for? Go build something amazing.
Frequently Asked Questions (FAQs)
Is WhatsApp Cloud API completely free to use?
The WhatsApp Cloud API is free to set up, and accessing the WhatsApp Business API setup itself doesn’t have a fee if you’re using Meta’s Cloud API directly. But actual usage comes with charges based on conversations (and now individual messages from July 2025), not the API itself.
How do I get a permanent access token for WhatsApp Cloud API?
You need to create a System User in Meta Business Suite, assign it the necessary permissions (whatsapp_business_messaging and whatsapp_business_management), and generate a non-expiring token. You’ll also learn how to generate secure access tokens and send both template and non-template messages during the standard setup flow.
What is the difference between WhatsApp Cloud API and WhatsApp Business API?
Cloud API is hosted by Meta, faster and cheaper. Business API is hosted by third-party BSPs with more control. Additionally, from late 2025, the on-premise Business API will no longer receive updates or support from Meta.
Can I send bulk messages using WhatsApp Cloud API?
Yes, but only through pre-approved message templates. 5You can start messaging customers immediately and reach up to 250 unique contacts in a 24-hour period. Upon verifying your Meta Business Portfolio, you can increase your messaging limit and send up to 100,000 messages daily.
What should I do if I see a “this number is unregistered” error in WhatsApp Cloud API?
This error typically means the number is already linked to another WhatsApp account or was not properly verified during setup. You’ll need to delete the existing WhatsApp registration on that number, use a fresh, unregistered phone number, and complete the OTP verification step in the Meta Developer dashboard. If the number was previously registered with an on-premise API, deregister it from that system first before using it with Cloud API.

